
Sync to Mac
Learn how to sync your health data to your Mac.
Last updated: May 20, 2026
On this page
- Overview
- Prerequisites
- Quick Sync
- Add the Sync to Mac Widget
- Step 1: Enter Edit Mode
- Step 2: Add the widget
- Manual Sync
- Sync Health Metrics
- Sync Workouts
- Sync Behavior
- Automatic Background Sync
- Sync Frequency
- Accessing Synced Data on Mac
- Opening Health Auto Export Mac App
- Viewing Health Metrics
- Viewing Workouts
- Troubleshooting
- Common Issues
- Verify Synced Data
- Tips and Best Practices
Sync to Mac User Guide
Sync to Mac allows you to automatically sync your Apple Health data from your iPhone to your Mac. This enables you to view your health data on larger screens using the Health Auto Export Mac app.
Overview
Sync to Mac uses iCloud to automatically synchronize your health metrics and workouts from your iPhone to your Mac. The data is stored securely in your iCloud account and can be accessed by the Health Auto Export Mac app.
Use Cases:
- Viewing health metrics and Workouts on Mac with larger screens
- Export synced data on Mac
- Creating backups of health data in iCloud
- Accessing health data across multiple Apple devices
How It Differs from iCloud Drive Automation:
- Sync to Mac is specifically designed for syncing to the Mac app
- Data is stored in iCloud Drive in a dedicated Auto Sync folder
- Optimized for the Mac app's data structure
- Automatic data syncing--see limitations
If you would like to sync data to iCloud Drive as CSV or JSON for use in Excel, Numbers or other applications, see the iCloud Drive automations guide.
Limitations
Health Data Access: Apps are not allowed to access health data while iPhone is locked. Sync to Mac will only run during periods when your device is unlocked. This is a limitation imposed by Apple which cannot be circumvented. More information
Background Processing: iOS limits background processing to preserve battery life. Automations rely on Background App Refresh and may not run immediately if:
- Background App Refresh is disabled for the app
- The device is in Low Power Mode
- The device has been inactive for extended periods
- System resources are constrained
- Multiple apps are competing for background execution time
Syncing Existing Data: Health Auto Export will incrementally sync your existing data (before you started using the app). Due to the constraints mentioned above, this will take a long time if left solely to automatic syncing. Please see the instructions and recommendations for manual syncing below in order to make your historical data visible on Mac.
Prerequisites
- An Apple ID/iCloud account
- Signed into iCloud on your iPhone and Mac
- iCloud Drive enabled
- Health Auto Export Mac app installed (for viewing data on Mac)
- Premium subscription (Sync to Mac requires premium access)
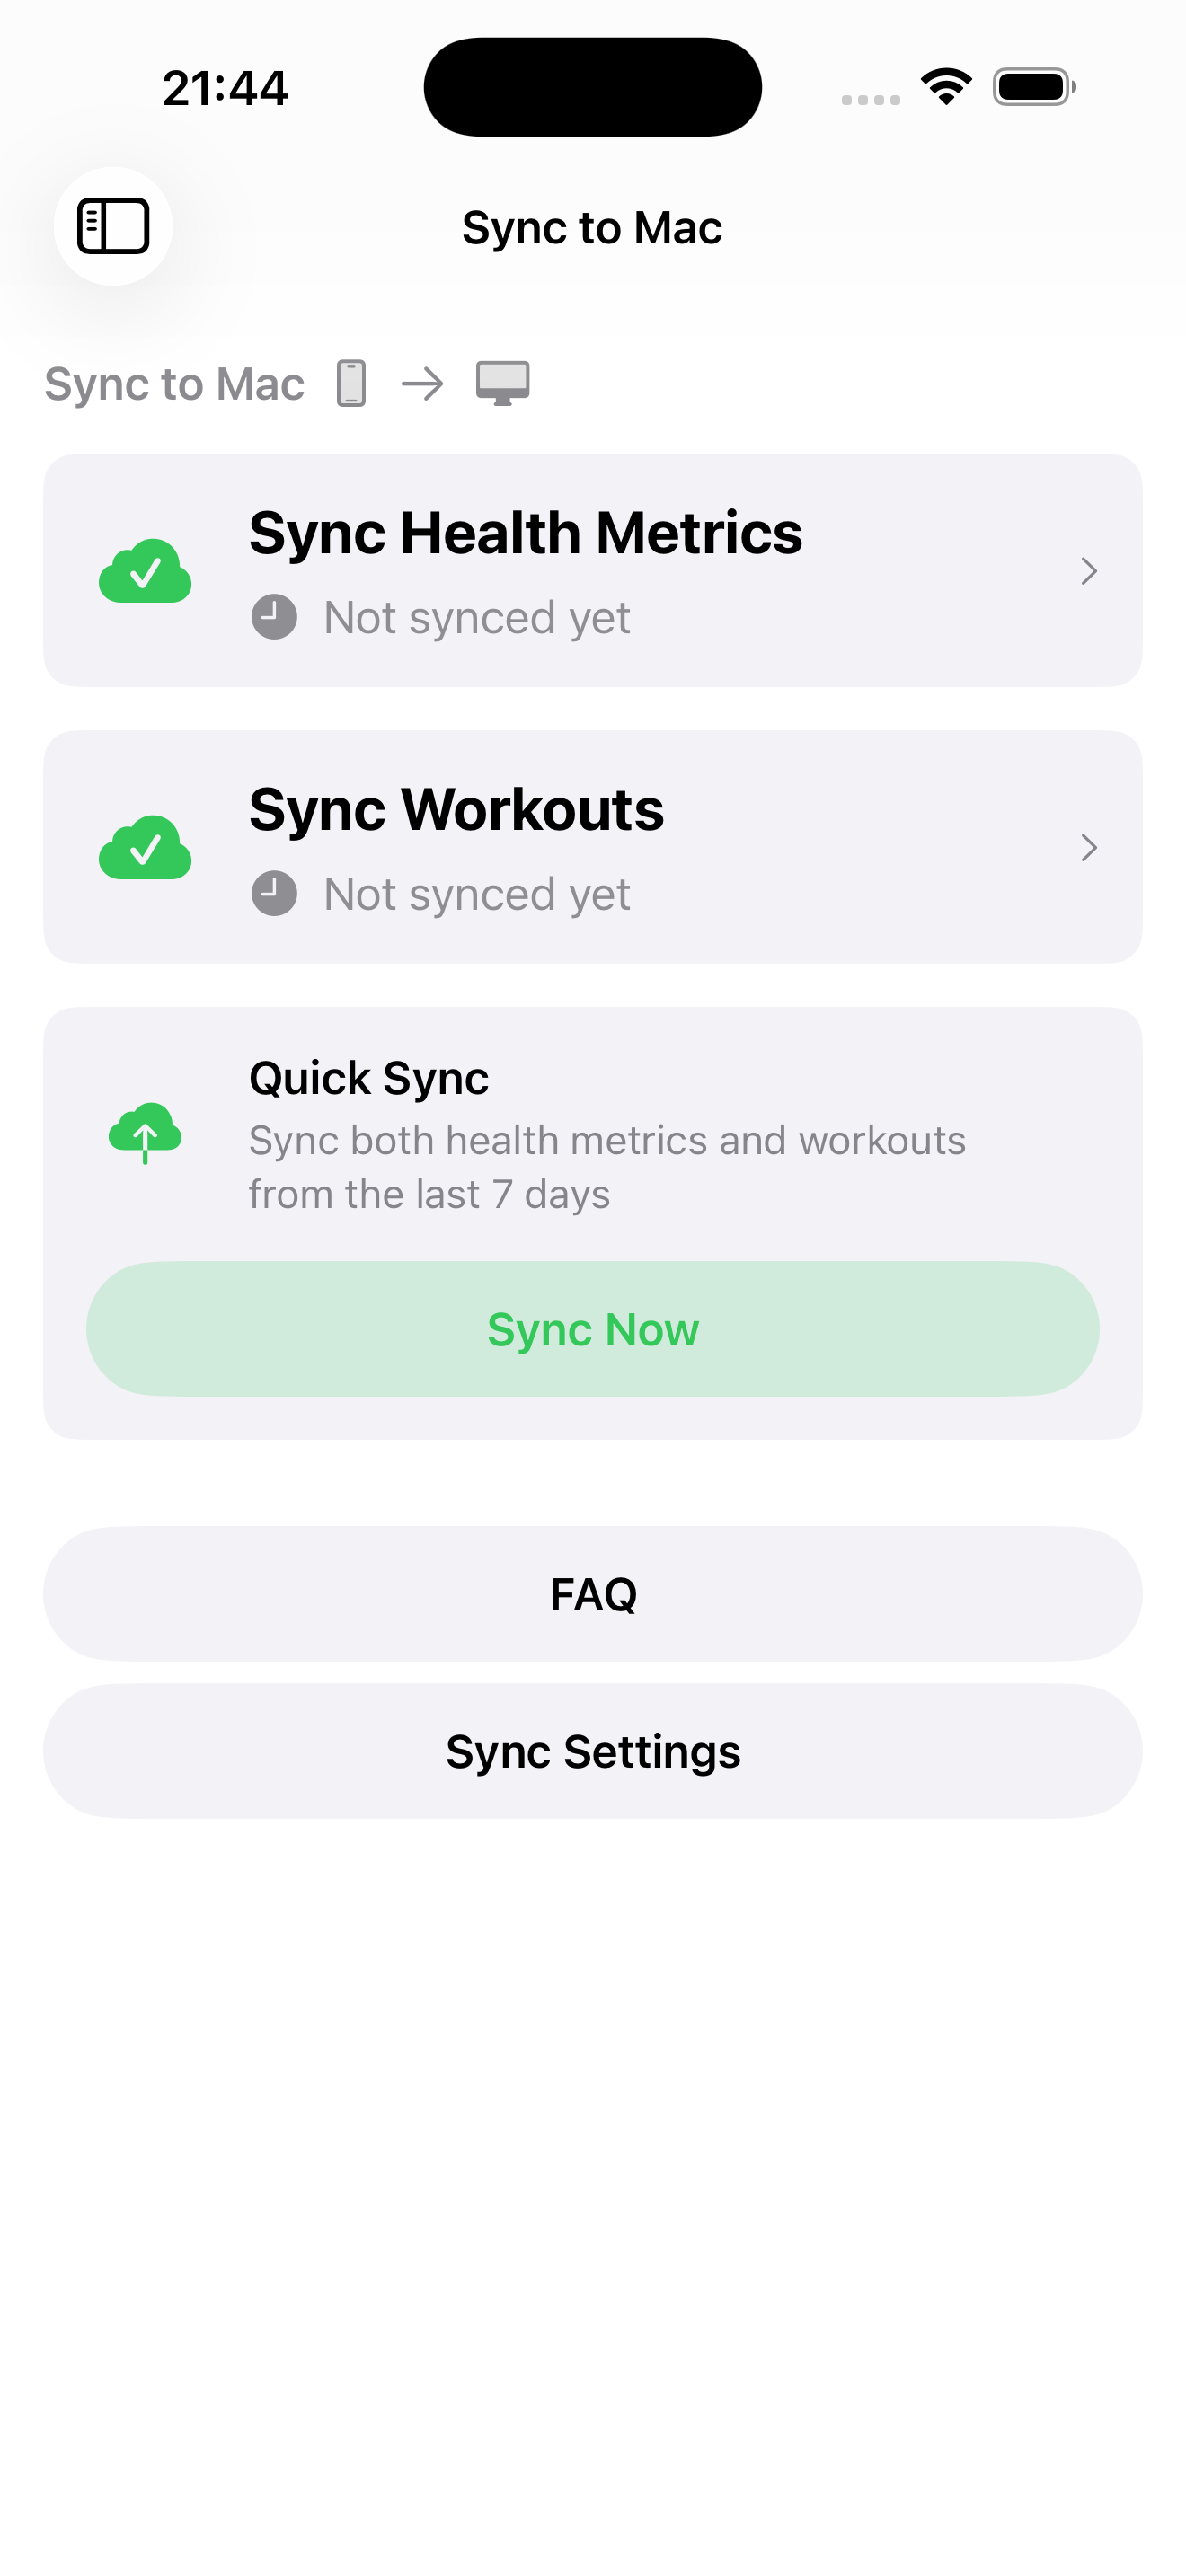
Quick Sync
Quick Sync provides a convenient way to get started syncing data between your iPhone and Mac, or to fill in recent missing gaps in data.
Tap on Quick Sync in order to sync data for the last 7 days to Mac.
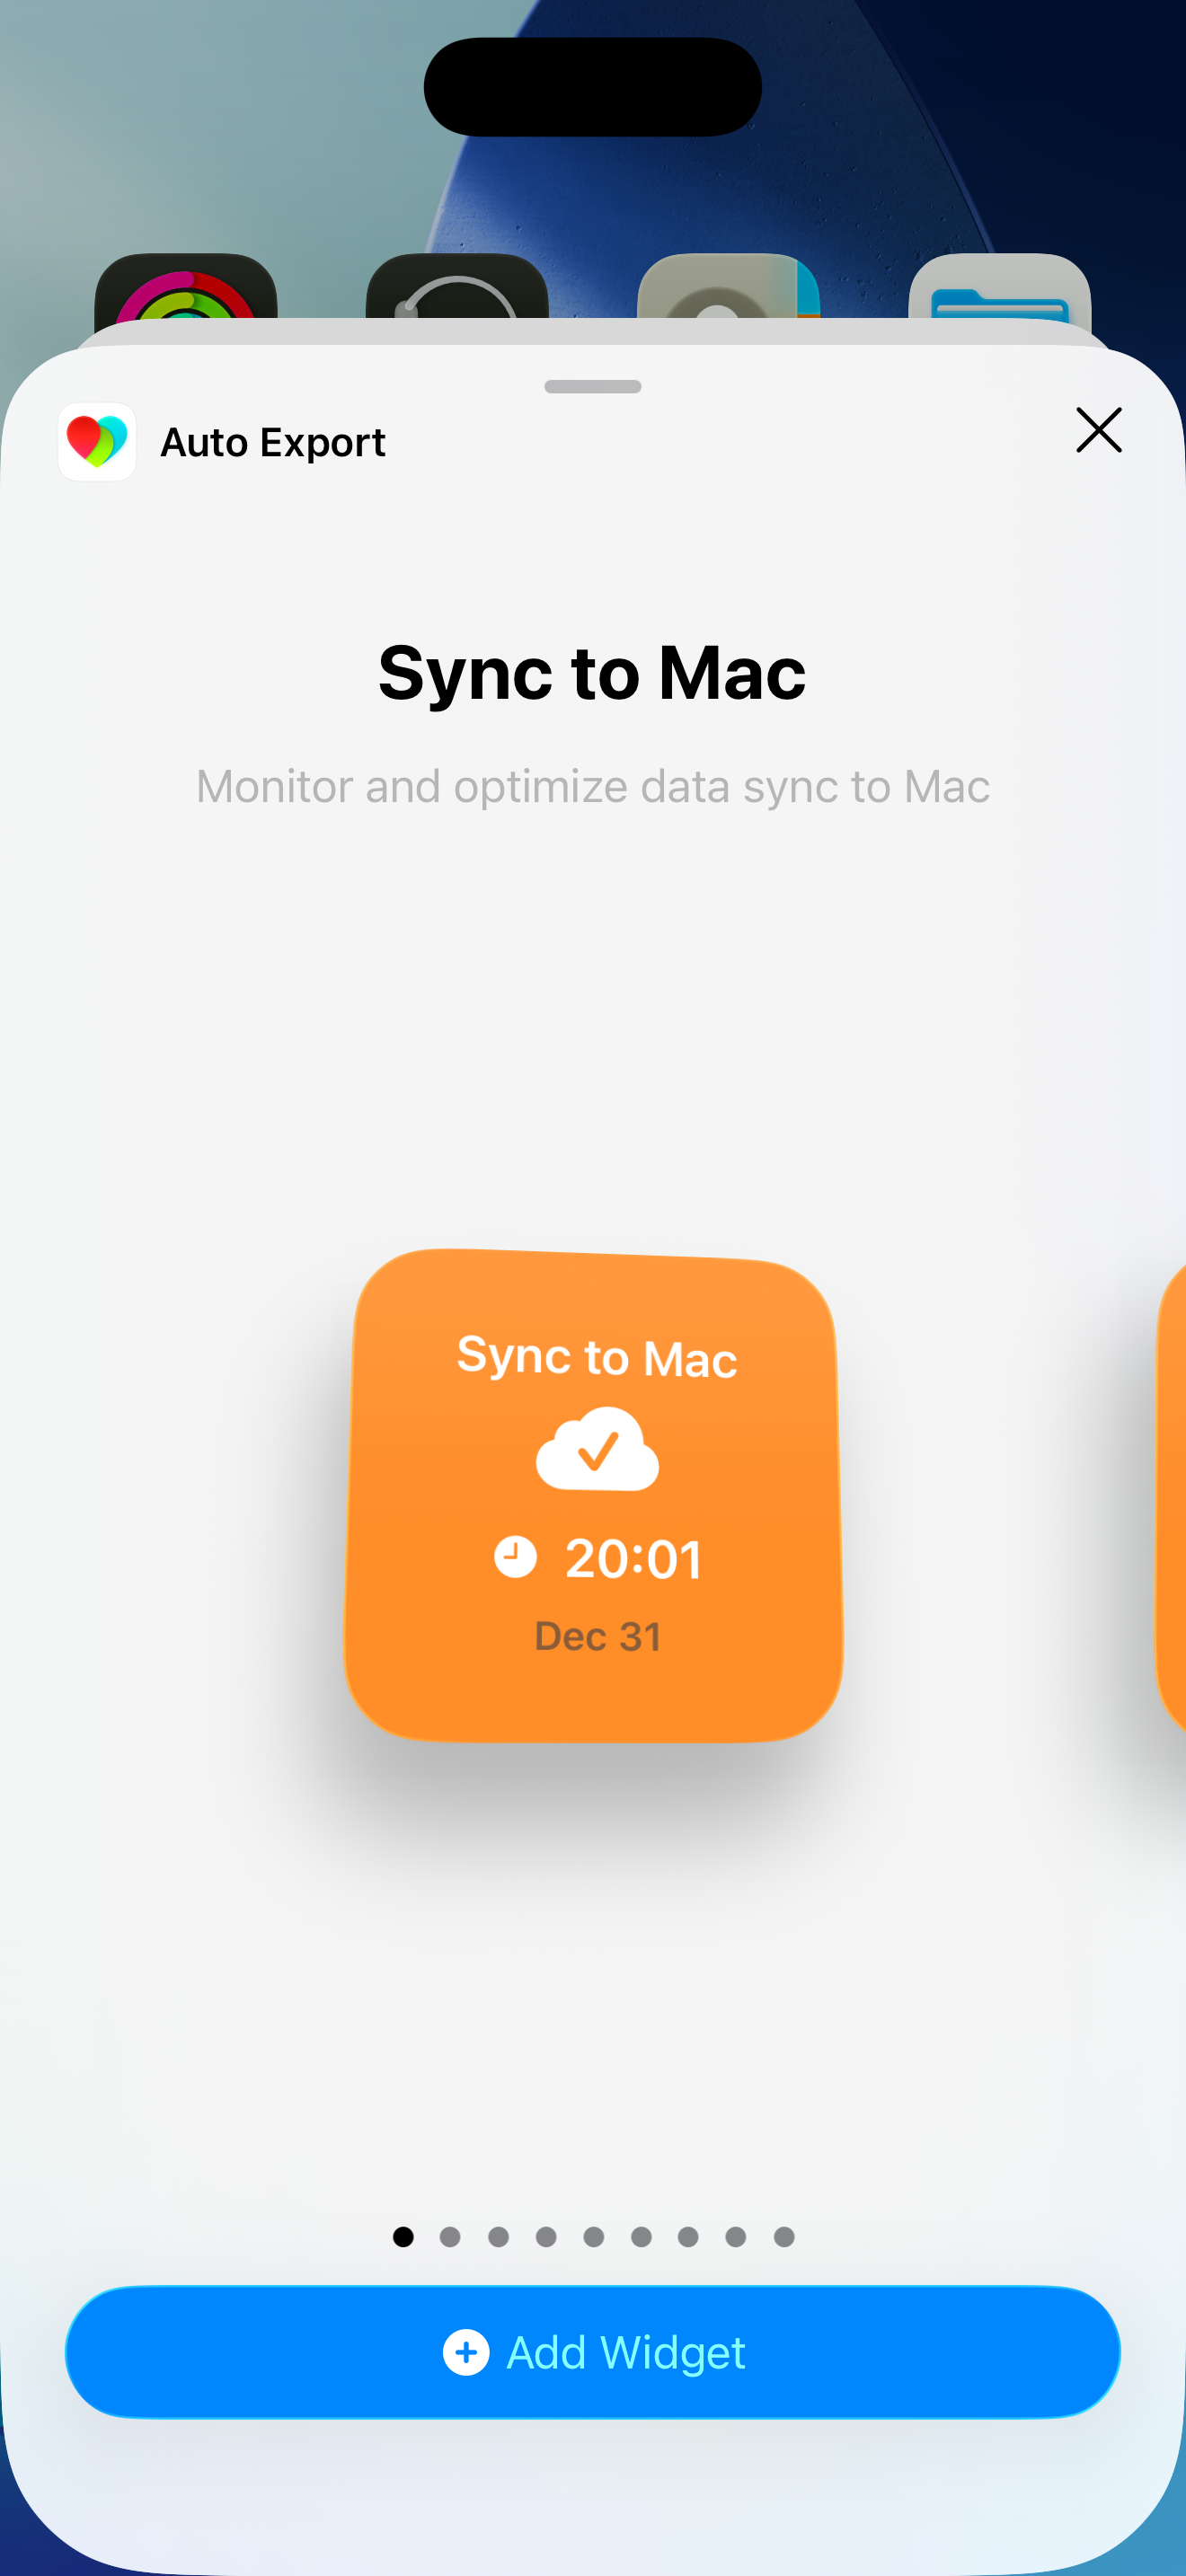
Add the Sync to Mac Widget
The Sync to Mac widget lets you monitor sync status on your Home Screen and can help background syncing run when the system triggers it.
Step 1: Enter Edit Mode
- Long press on your Home Screen
- Tap the "+" button in the top left corner
Step 2: Add the widget
- In the widget gallery, search for "Auto Export" or scroll to find it
- Select the "Sync to Mac" widget
- Tap "Add Widget" then drag the widget to your desired location
- Place the widget. It is recommended you place it on the first page of your Home Screen.
Manual Sync
With manual syncing, you can sync data for a specific date range. You want to do this to fill data gaps and or make some historical data available on Mac.
Sync Health Metrics
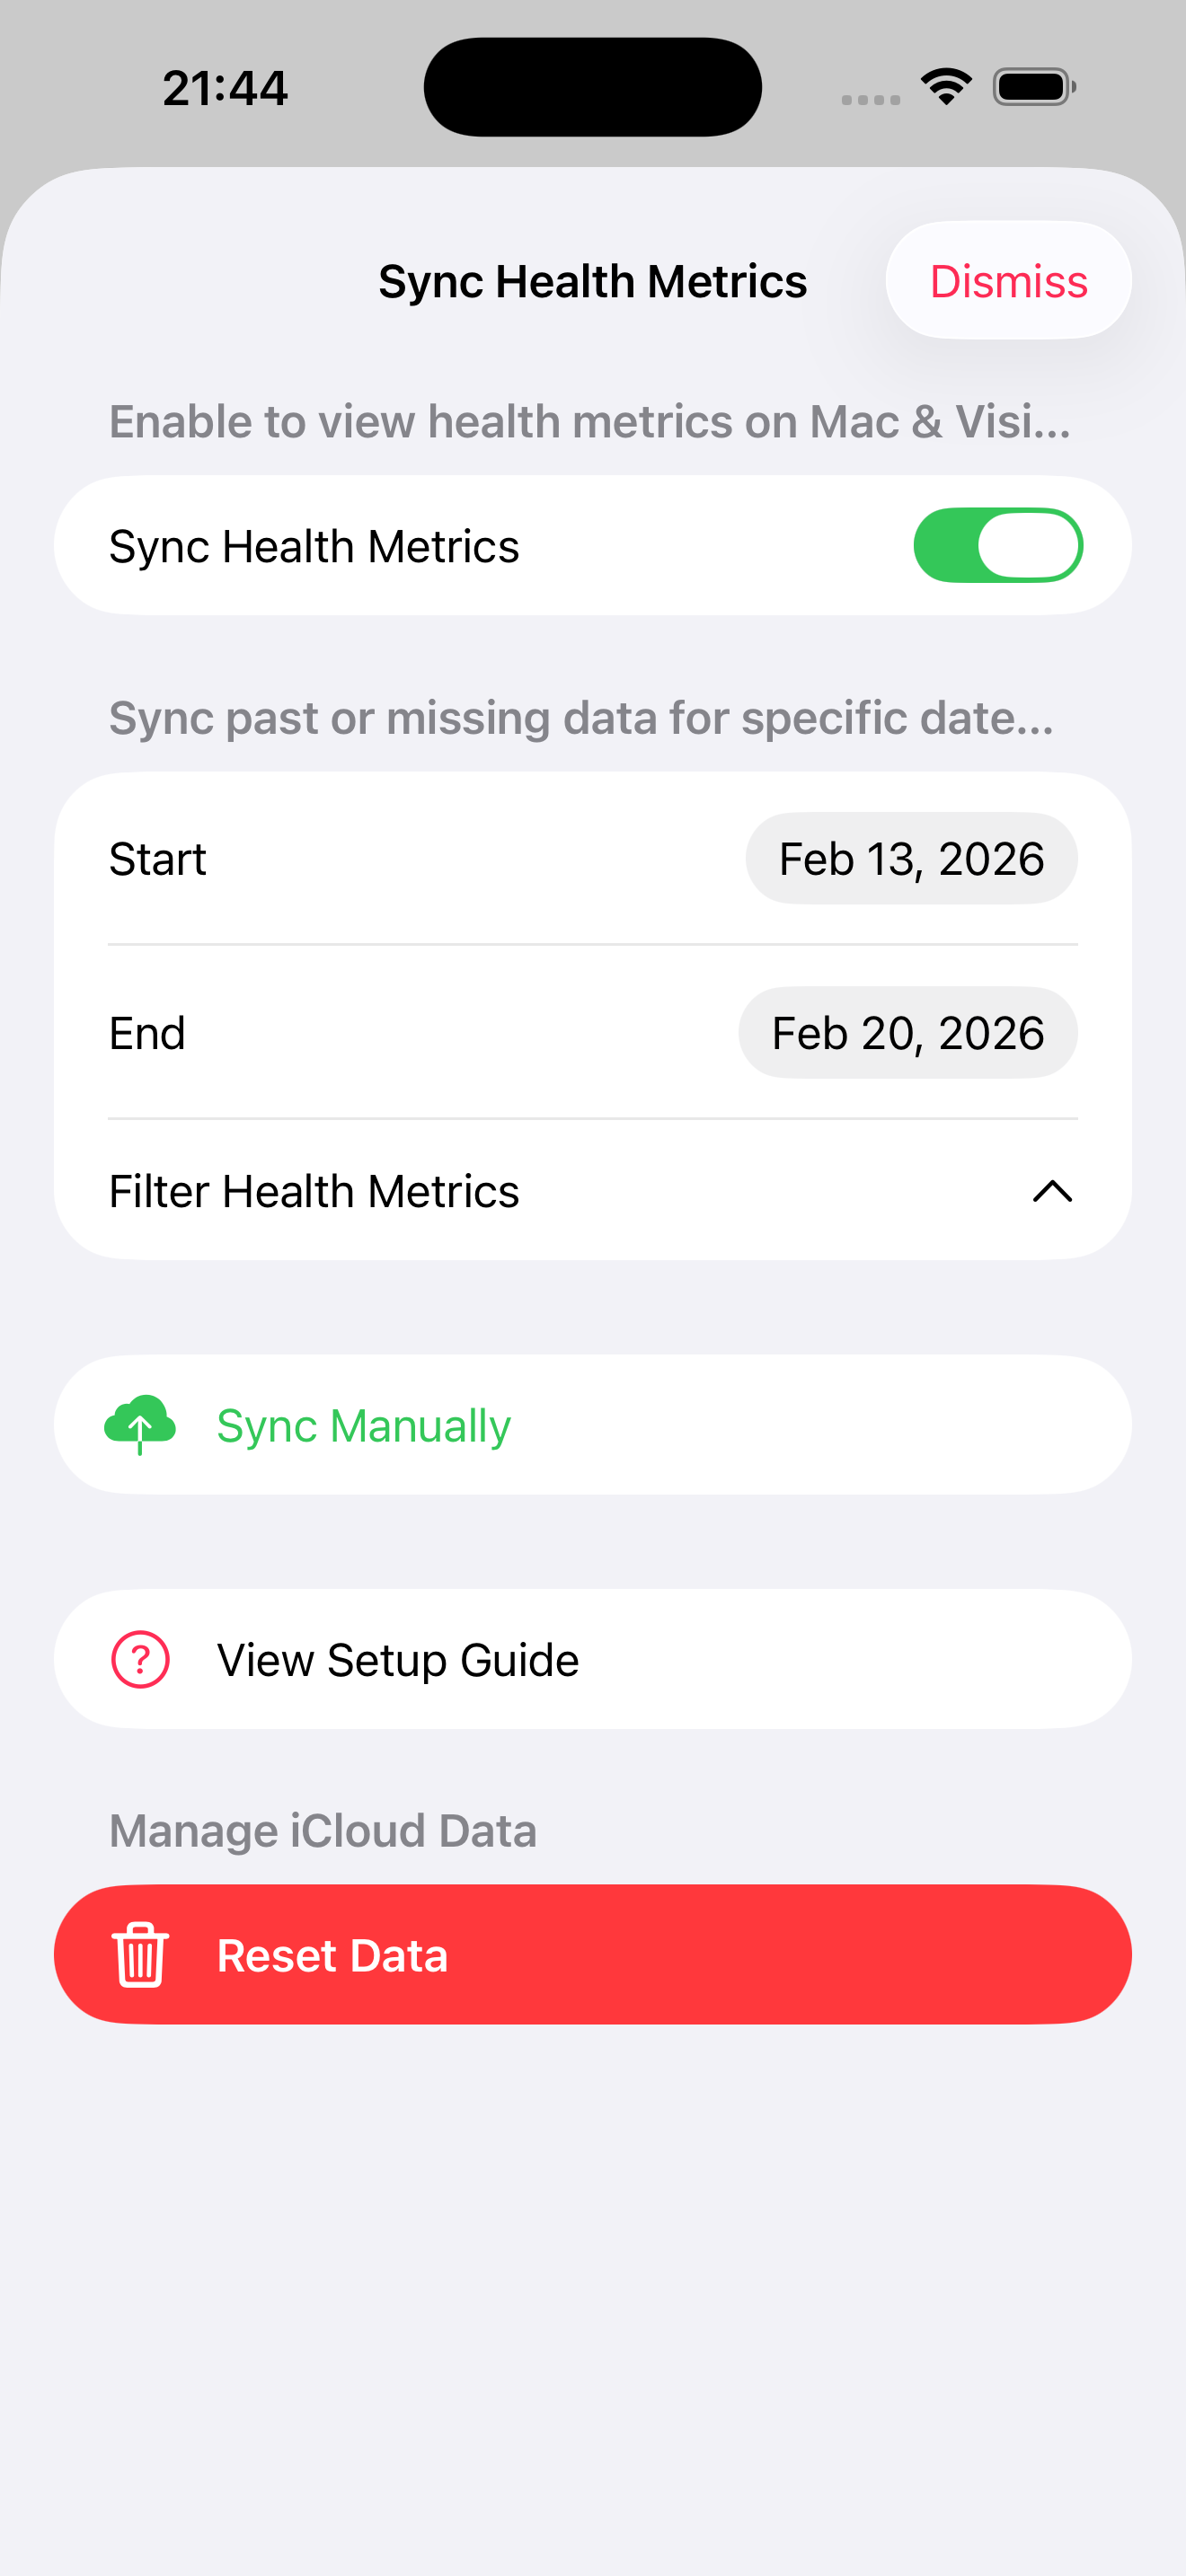
- Navigate to Sync to Mac
- Tap "Sync Health Metrics"
- Select "Filter Health Metrics"
- Limit the number of selected metrics for faster syncing
- Select metrics you are most interested in; deselect metrics that don't have any data
- Select a date range:
- Use the date pickers to choose start and end dates
- Limit selected date ranges for faster processing
- Tap "Sync" to start the sync process
- Wait for the sync to complete
Sync Workouts
- Navigate to Sync to Mac
- Tap "Sync Workouts"
- Select a date range:
- Use the date pickers to choose start and end dates
- Limit selected date ranges for faster processing
- Tap "Sync" to start the sync process
- Wait for the sync to complete
Note: Manual syncs can take several minutes depending on the amount of data and date range selected.
Sync Behavior
Automatic Background Sync
When Sync to Mac is enabled:
- Health metrics sync automatically in the background
- Workouts sync automatically in the background
- Syncs occur periodically based on system scheduling
- Data is synced incrementally (only new/changed data)
Sync Frequency
Sync to Mac runs automatically:
- When the app is in the background
- When triggered by the Sync to Mac widget (see Adding the Sync to Mac widget above)
- Based on system background task scheduling
Note: The exact sync frequency depends on iOS background task scheduling and cannot be manually configured.
Accessing Synced Data on Mac
Opening Health Auto Export Mac App
- Open the Health Auto Export Mac app
- The app will automatically load synced data from iCloud
Viewing Health Metrics
- In the Mac app, navigate to Health Metrics
- Select a date range to view
- View charts and data for your synced metrics
Viewing Workouts
- In the Mac app, navigate to Workouts
- Browse your synced workouts
- View workout details, routes, and metrics
Note: Data appears in the Mac app after it has been synced from your iPhone. There may be a delay between syncing on iPhone and data appearing on Mac.
Troubleshooting
Common Issues
Data Not Appearing on Mac
- Ensure Sync to Mac is enabled on your iPhone
- Verify you're signed into the same iCloud account on both devices
- Check that iCloud Drive is enabled
- Try a manual sync to force data transfer
Verify Synced Data
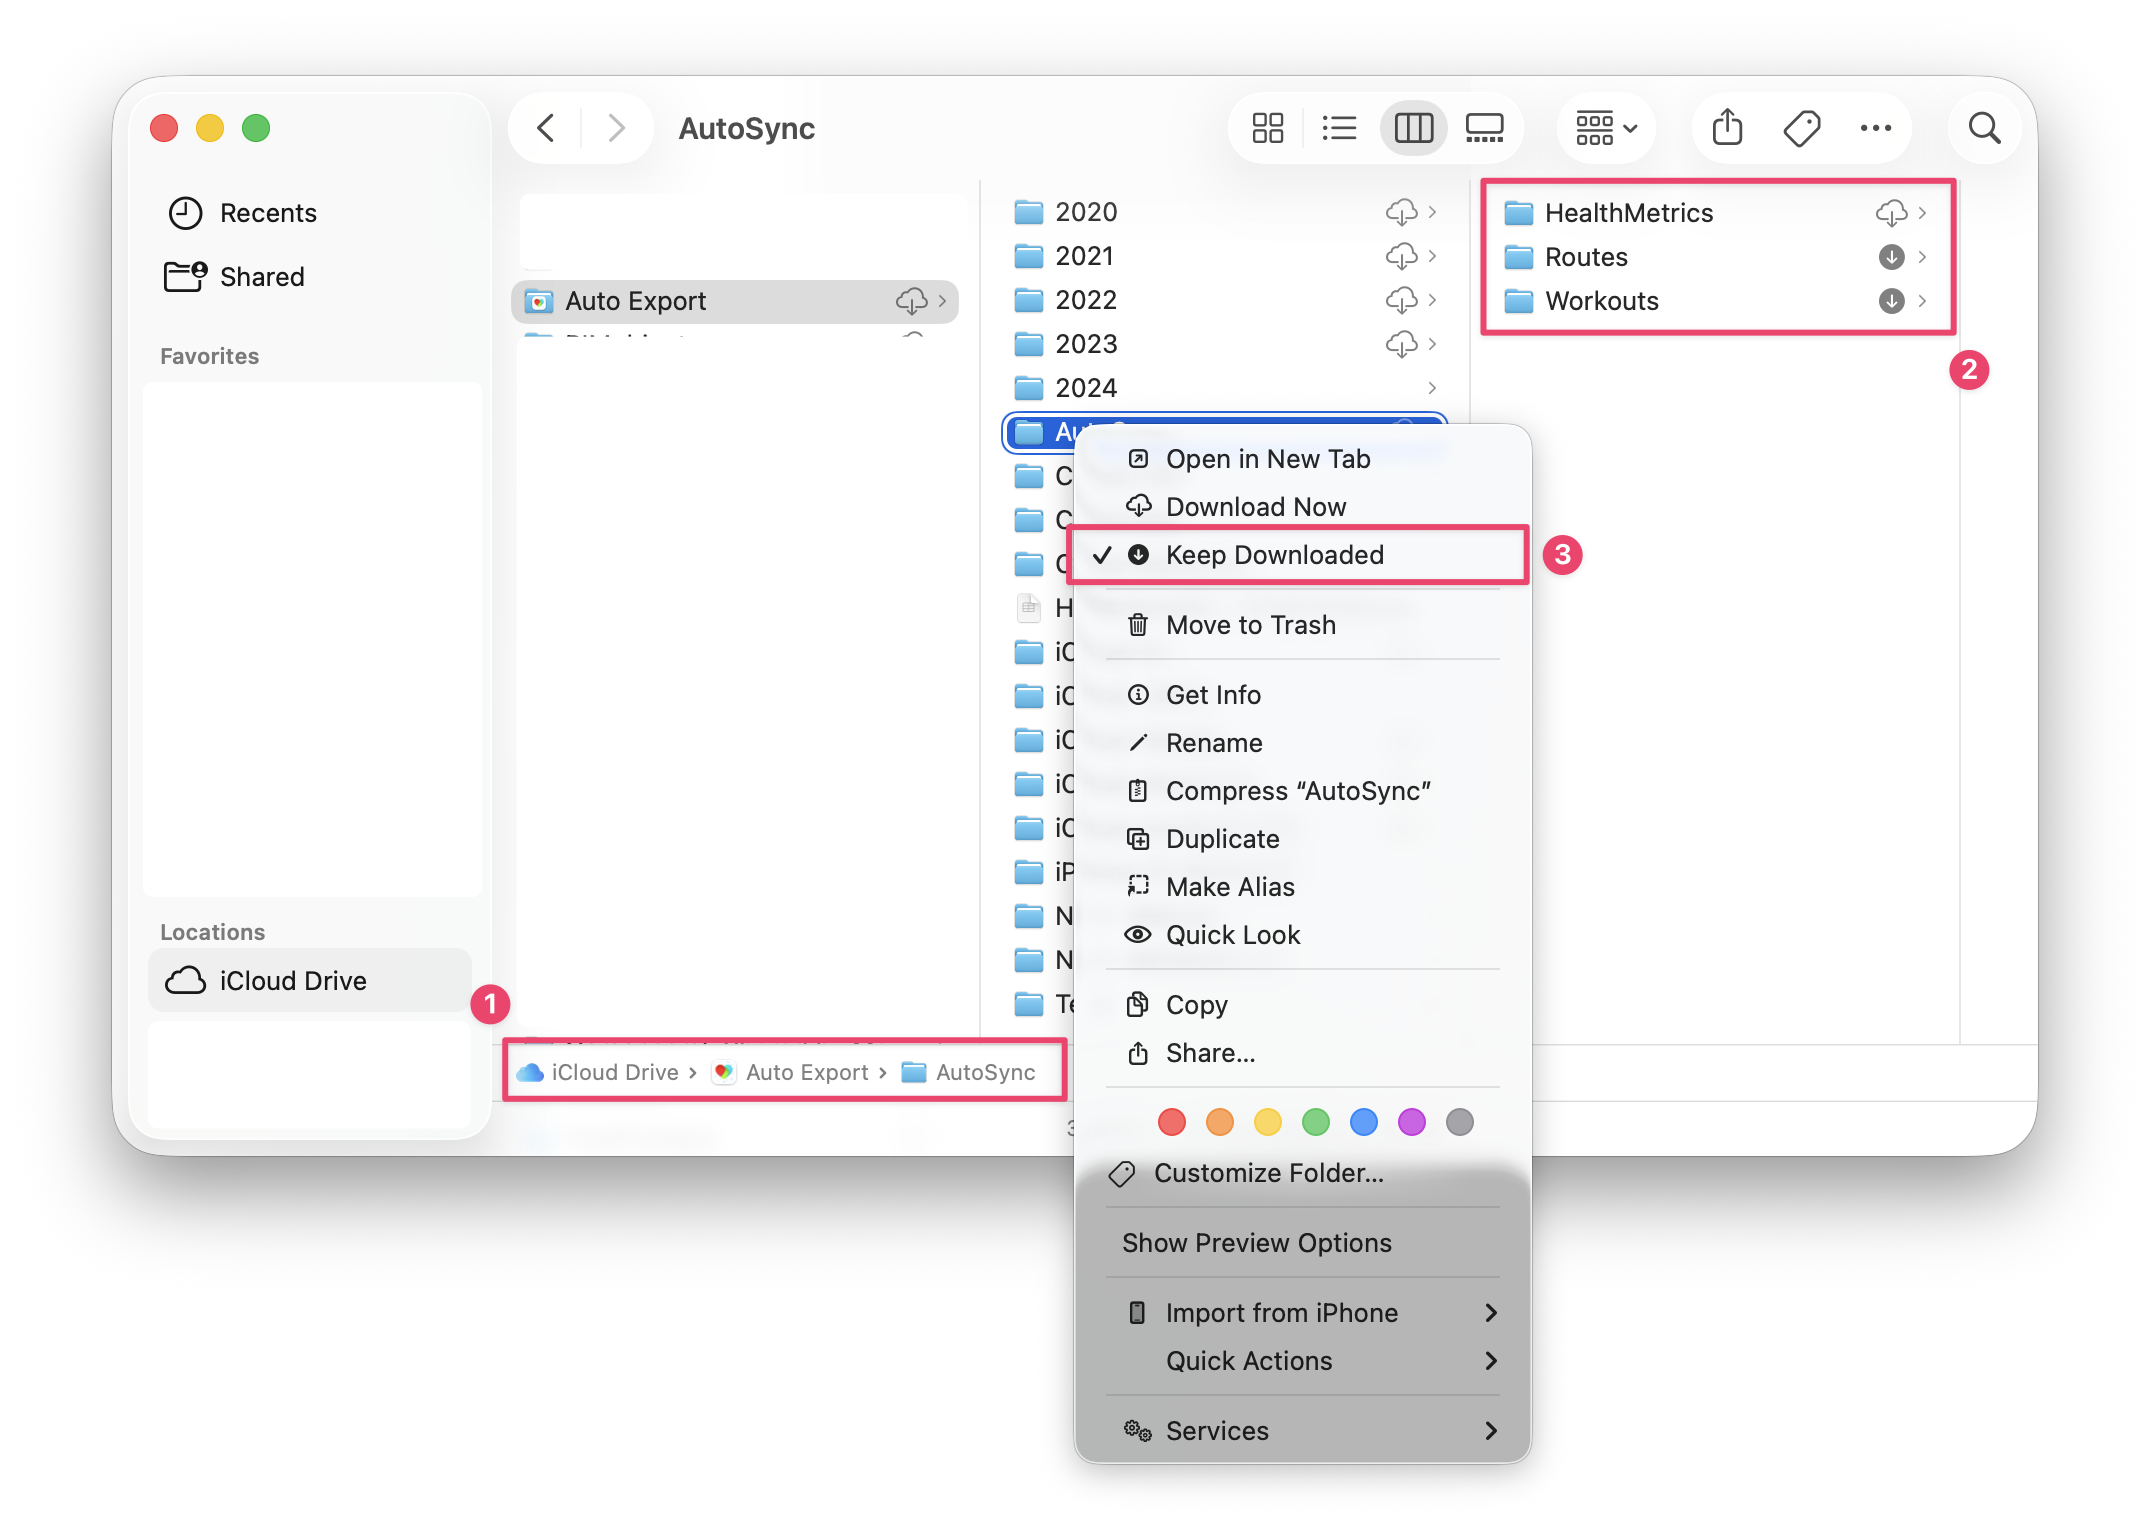
Data is stored in iCloud Drive in an app-managed folder. Refer to the screenshot below:
- Navigate to iCloud Drive > Auto Export > AutoSync as shown.
- Right-click on the AutoSync folder and select "Keep Downloaded."
- This ensures that synced data is persisted on your Mac.
- macOS storage optimizations will sometimes keep references to cloud data, but Health Auto Export for Mac can only read data stored on disk.
- Data is saved in the following folders:
Health Metrics
Workouts
Routes
In the
Health Metricsfolder- Select a health metric
- Health metric data files are saved by date using names formatted as
yyyyMMdd.hae - This means data for Jan 31, 2026 would be saved in the file
20260131.hae
In the
Workoutsfolder files are saved using a combination of workout name, formatted date and workout ID.- E.g.
traditional_strength_training_ABCD-EFGH-IJKL.hae
- E.g.
In the
Routesfolder route data is saved for workouts with associated workout routes. The file name corresponds to the ID of its associated workout.
Sync Not Working
- Verify you have a premium subscription
- Check that iCloud is enabled and working
- Ensure you have internet connectivity
- Verify iCloud Drive is enabled in Settings
- Check that the app has necessary health data access
Slow Sync Performance
- Large date ranges take longer to sync; try syncing smaller date ranges
- Select fewer health metrics
Tips and Best Practices
Initial Setup:
- Enable both Health Metrics and Workouts sync
- Perform an initial manual sync for historical data
- Allow automatic syncing to handle new data
- Add the Sync to Mac widget to your Home Screen (see Adding the Sync to Mac widget above)
Automatic Syncing
- Charge your device and use iPhone Mirroring
- When your device is being charged iOS places less restrictions on device performance, so data can sync more frequently
- By using iPhone Mirroring, your device behaves in the same way as if it were unlocked. This means health data is accessible by Health Auto Export in order to run automated actions
- Charge your device and use iPhone Mirroring
Date Ranges:
- Use manual sync for specific date ranges when needed
- Let automatic sync handle ongoing data
- Sync historical data in smaller chunks if needed
Performance:
- Syncing runs automatically in the background
- Manual syncs can be resource-intensive
Data Management:
- Data is stored securely in your iCloud account
- Synced data counts toward your iCloud storage
- Old data is retained unless manually deleted